Welcome back! Thank you for tracking this month’s Blog Hop.
My card is called a Pull-Out Pop-Up card. I used the beautiful Painterly Pears DSP. It has a mechanism under the front flap. When you pull the Old Olive and yellow DSP, it comes out. Then, a flap pops up. (see photo’s below.)
I got the tutorial from Stamping with Amore. She made a cute card for a child. I used Painterly Pears in my version. I made a tutorial for this card. If you would like the tutorial, message me and I will e-mail it to you.
Please follow the links below for many more beautiful fun fold cards. And thank you so much for taking the time to follow our blog hop.
Welcome to the SU Demo Fun Fold Blog Hop! You will find many more gorgeous fun fold cards by using the links below.
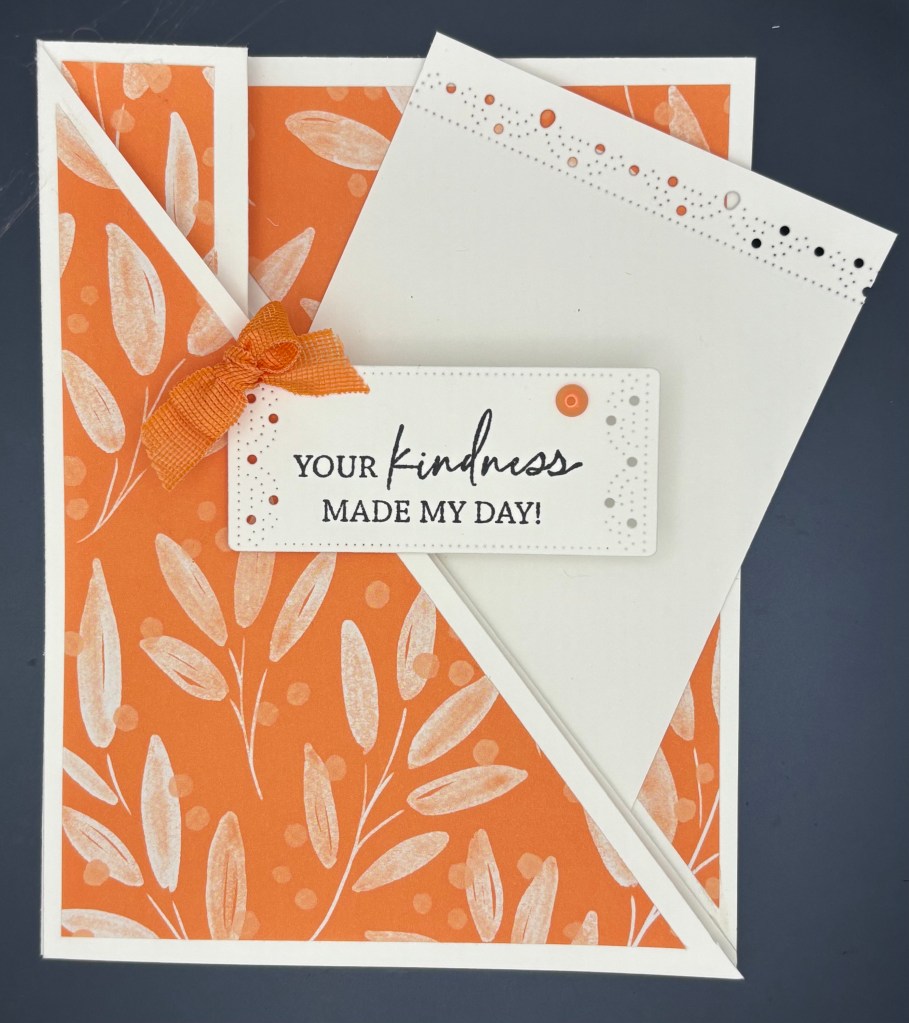
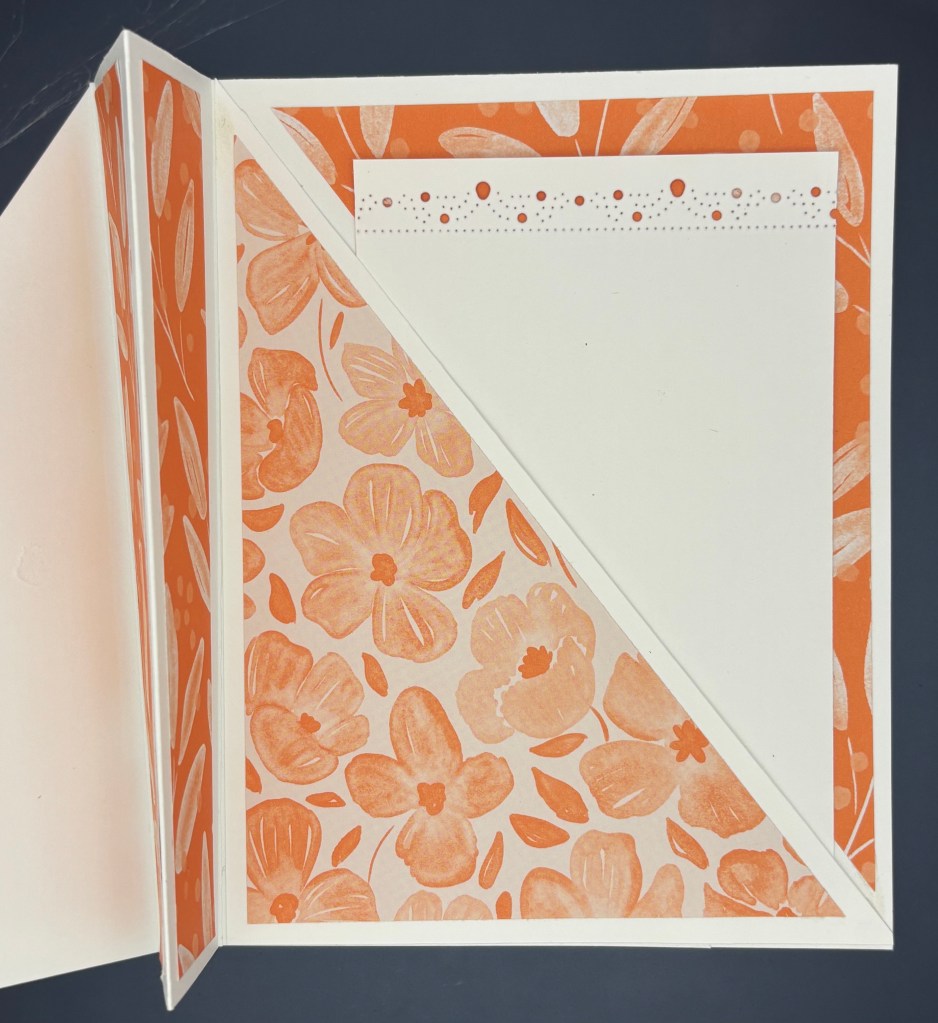
For my fun fold, this month I made an Accordion Pocket Fold inspired by Lisa Ann Bernard.
The Base is 5-1/2″ x 11″ scored at 4-1/4″, 5-1/2″ and 6-3/4″. Then I cut from the 4-1/4″ score line to the bottom right corner (save this piece).
I cut a 6″ 20250-2027 In Color DSP to 4″ x 5-1/4″. I cut this piece diagonally from the top left corner to the bottom right corner. I centered and adhered the left triangle to the front of the card. Then centered and adhered the right triangle to the inside top right.
I cut 2 pieces of the same DSP strips at 7/8″ x 5-1/4″. I centered them and adhered them to the inside pillars.
I adhered the “saved” triangle on the inside left of the card. I used Tear and Tape around 2 edges. It was placed right along the 3rd fold line creating a pocket.
I cut a 3-3/4″ x 5″ coordinating DSP. Then cut it diagonally at the top left corner down to the bottom right corner. Center and adhere this DSP to the pocket.
I cut a 3″ x 4-1/2″ piece of white cardstock. Then, I used the Sentimental Frame Dies to decorate the top edge.
Again using the Sentimental Frame dies, I cut a rectangle to use for the sentiment. I used Mixed Labels Stamp Set for the sentiment.
Using Timid Tiger Ribbon, I made a small bow and adhered it with a glue dot. I embellished the card with (1) 2025-2027 In Color Flat Pearl.
This card turned out nice and I enjoyed creating it. The only suggestion I have is be careful for directional DSP.
Thank you for stopping by! Be sure to follow the links below to see the other featured artisans.
Welcome to the Independent Stampin’ Up! Demonstrators Fun Folds Blog Hop. There’s a lineup below to make it easy for you to hop along and see everyone’s creations.
This month I used the beautiful Kintsugi Inspirations DSP, stamp and dies. If you don’t know what Kintsugi is here is what AI on Google says about it. “Also known as kintsukuroi, it is the Japanese art of repairing broken pottery. This is done by mending the cracks with lacquer mixed with gold, silver, or platinum.”
It is a ancient art form. The DSP in this suite is amazing.
My card is a shadow box fun fold. It starts with a standard card 5-1/2″ x 8-1/2″ scored at 4-1/4″. To the front of the card I added a piece of DSP that measures 4″ x 5-1/2″. I cut another piece of the same cardstock at 5-1/2″ x 6-1/4″. and scored at 1/2″ and 1″ from the left and right on the 6-1/4″ side. Folded and burnished the score lines. Using the largest Sentimental Framing dies I cut out a frame on matching cardstock. With the smaller frame, I then centered and cut a rectangle, for a window. Then I centered the frame on the 5-1/2″ x 6-1/4″ front.
After that I adhered the furthest fold, using glue, to the card front. (be sure to check that you have the card base orientated correctly.)
I used Tear n Tape on both ends of a piece of 1/2″ x 3-7/8″ window sheet. I centered the piece behind the opening. This is where I placed my sentiment.
I fussy cut a bowl and a vase from the DSP, and adhered using dimensionals. I cut the floral piece, in white cardstock, using the die from the set. I then placed it in the tall vase, using glue.
I used the gold Floral Accents embellishments. On the inside of the card, I adhered a piece of 4″ x 5-1/4″ white cardstock. Add a sentiment as desired.
I hope you like this version of a shadow box.
Please follow the links below to see more stunning cards.
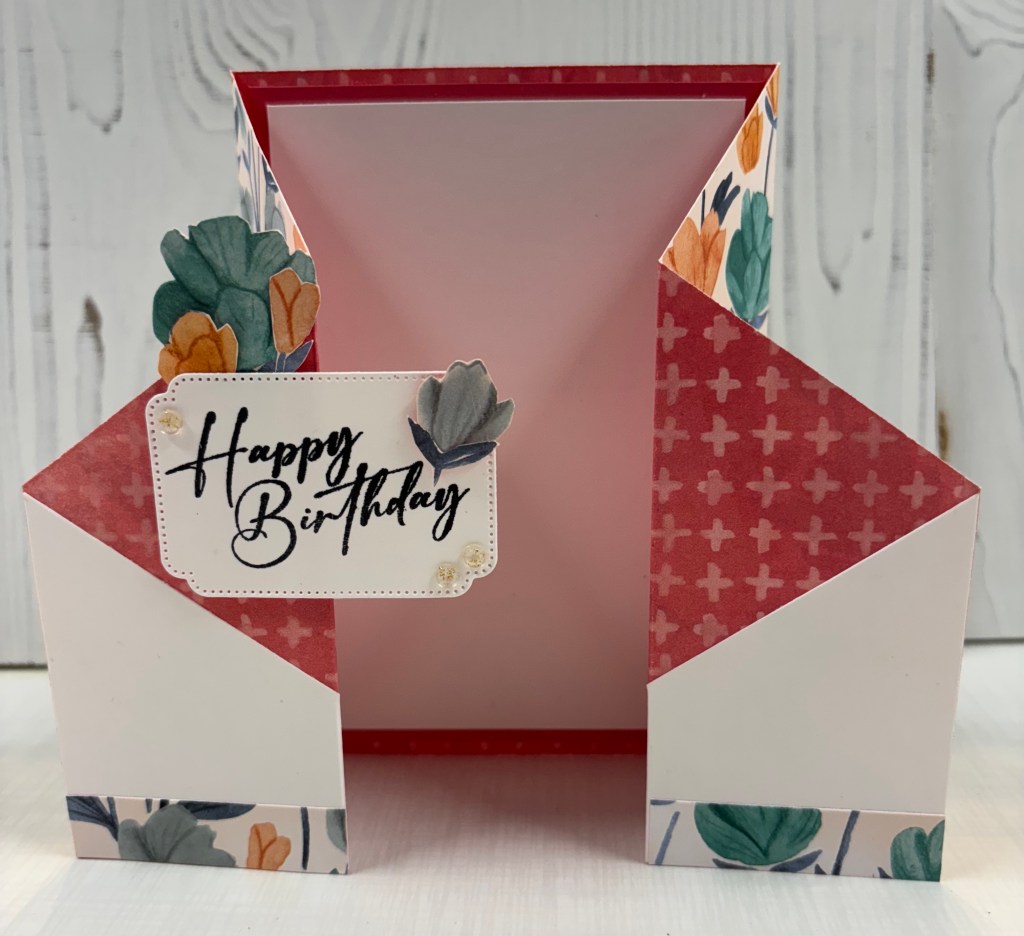
Welcome to the July Fun/Fancy Fold Blog Hop. This month, I used a card from Deb of Delight of my Art. I changed it up a bit. She created a gate fold. She cut off the top right and left corners. Then, she applied them to the bottom left and right corners. Try as a I may, I couldn’t find a way to do that without the flowers being upside down. So I altered it some.
I cut the DSP 5-1/2″ x 12″. Then the DSP is scored at 2″ and 4″ on the left side along the long side. I turned the DSP and again scored at 2″ and 4″ on the right side. This way my score line looked the same. Next I measured down the right side to 2-3/4″ and made a pencil mark. After which I cut from the 4″ score line to the 2-3/4″ mark. Then repeated this on the left side of the DSP.
I traced the cut off pieces of DSP onto white cardstock and cut them. Then those pieces of white cardstock were applied to the left and right bottom corners. Now I had a tuxedo looking card.
I cut (2) 1/2″ x 2″ pieces of DSP and applied to the front of the card at the bottom.
From there I cut a piece of Strawberry Slush cardstock at 3-3/4″ x 5-1/4″. A piece of white cardstock was cut at 3-1/2″ x 5″ and adhered to the Strawberry Slush cardstock. This unit was adhered inside the center panel of the DSP.
After that I stamped a sentiment on white cardstock and cut it using the tag die from Unbounded Love. The sentiment is from the same stamp/dies set.
I fussy cut a few flowers from the Florals in Bloom DSP and placed them around the tag. One was placed inside the card.
To finish the card I added the Strawberry Slush and Pretty in Pink Gems.
I hope you like my card.
Please follow the link below to see the other amazing fun fold cards that were created this month.
Welcome to the Independent Stampin’ Up! Demonstrators Fun Folds Blog Hop. The theme is “Anything Goes.” There’s a lineup below to make it easy for you to hop along and see everyone’s creations. (click on the photos to make them larger)
This month’s design is called Floating Tent Easel card. I was inspired by Kate Morgan from Australia.
First, I fussy cut several flowers from the Floral Impressions 12″ x 12″ DSP. And because there were no measurements available, I created my own measurements for the card.
I cut Summer Splash card stock at 4-1/4″ x 11″ and scored at 5-1/2″. Then I cut off 4″ from the bottom of the card front. I scored that in 1/2 at 2″ (tent piece). I set this aside.
Then I cut pieces of Summer Splash card stock at 1-1/2″ x 4-1/2″, 1-1/2″ x 5″ and 1-1/2″ x 4-1/4″.
Then I took the DSP and cut two different patterns. They measured (2) 1-3/8″ x 4-1/8″ and (2) 1-7/8″ x 4-1/8″ with the 1st pattern. Using the 2nd pattern, I cut 1-3/8″ x 4-1/8″, 1-3/8″ x 4-7/8″, 1-3/8″ x 2-7/8″. I then centered and adhered them to the coordinating card stock pieces (see photo). There are 2 pieces on the back of the card. One on the back pillar (floral) and one across the top (circle print) on the tent piece.
I centered the 1-1/2″ x 4-1/2″ unit and adhered it to the back of the short card front. Then, I attached it to the inside of the tent piece. I then centered and adhered the 1-1/2″ x 5″ unit to the front of the tent piece. This will make the easel piece. Be sure to measure so that they align with with the bottom section so as not to exceed 5-1/2″.
Next, I adhered the fussy cut flowers. I glued some of them. I used dimensionals for others to create the easel stopper.
Next was the sentiment in coordinating ink. I placed it on the top, short panel. I glued 3 more flowers on the top left of the card base.
Finally, I added embellishments and Wink of Stella.
I hope you really enjoy this fun fold card. I really had fun putting it all together. Please follow the links above.