Fancy/Fun Fold Blog Hop-September 2025

Thank you for stopping by to see our September 2025 Blog Hop.

Please be sure to scroll down to see other participants and check out their beautiful designs.

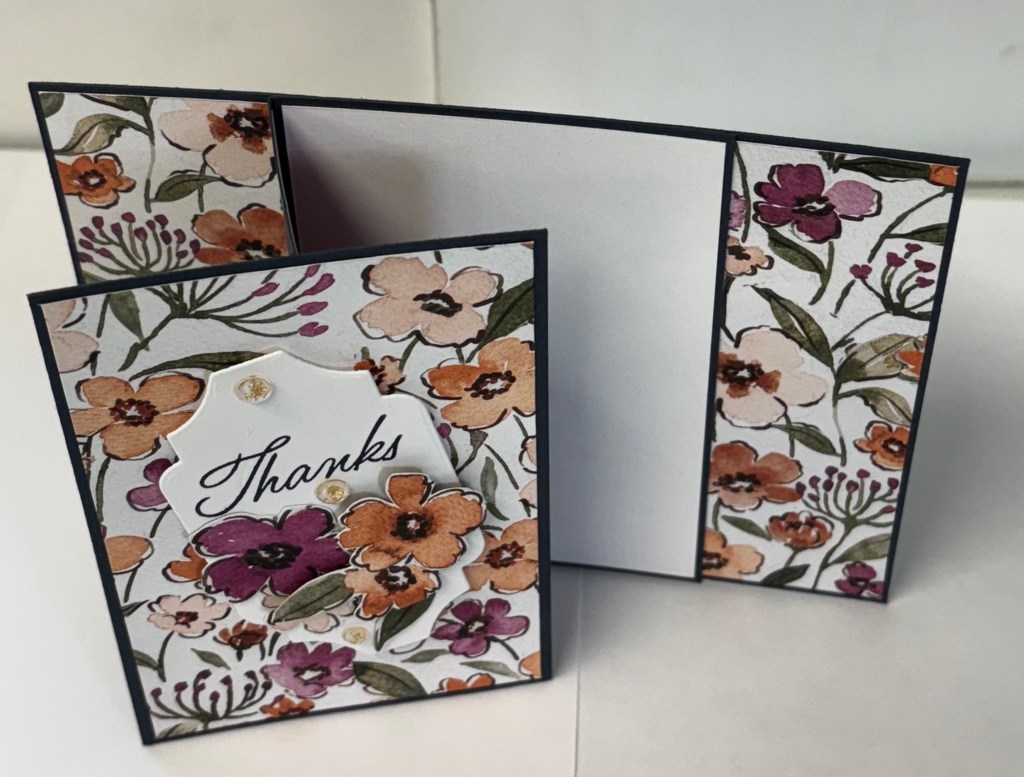
This month’s card was a fun one to make. It’s a center Z fold card.

I cut a piece of card stock at 4-1/4″ x 5-1/2″. Then a second piece at 4-1/4″ x 5-1/2″ and scored it at 1-3/8″ and 2-3/4″ (mountain, valley). A third piece of the same card stock at 2-3/4″ x 4-1/4″

Burnish your fold well.

I cut a pieces of Floral Charm DSP at 1-1/2″ x 4-1/8″. I then cut a second piece along the same paper at 2-5/8″ x 4-1/8″. And a third piece was cut at 1-1/2″ x 4-1/8″ to ensure the pattern flows.

Cut one piece of coordinating DSP at 1-1/4″ x 4-1/8″.

Center the (2) 1-1/2″ x 4-1/8″ DSP pieces on the base. Adhere them on the left and right of the 4-1/4″ x 5-1/2″ base.

Center and adhere the 1-1/4″ x 4-1/8″ coordinating DSP on the inside, middle scored area. Center and adhere the 2-5/8″ x 4-1/8″ DSP to the 2-3/4″ x 4-1/4″ card stock.

Cut a piece of basic white card stock at 2-5/8″ x 4-1/8″. Center and adhere to the last fold of the scored 4-1/4″ x 5-1/2″ card stock.

Center and adhere this unit to the 1st fold section, putting glue only on the left side.

Center and adhere this unit to the center of the 4-1/4″ x 5-1/2″ base card. This creates a Z on the flat layer.

I die cut a tag. I stamped it and attached fussy cut flowers along the bottom of the die cut.Using dimensionals, adhere to the front panel. I also placed one inside on the white card stock. I embellished it with Strawberry Slush and Pretty in Pink embellishments.

I hope you like this simple but pretty Z fun fold.
1.Tracy Held – Trace Of Creativity (Australia)
2.Melva Peters – Stamping With Melva (Canada)
3.Michele Deschenes Michele’s Craft Cottage (USA)
4.Sharni Green – The Stamping Green (Australia)

Stampin’ Up Demo Fun Fold Blog Hop

Welcome to the SU Demo Fun Fold Blog Hop! You will find many more gorgeous fun fold cards by using the links below.

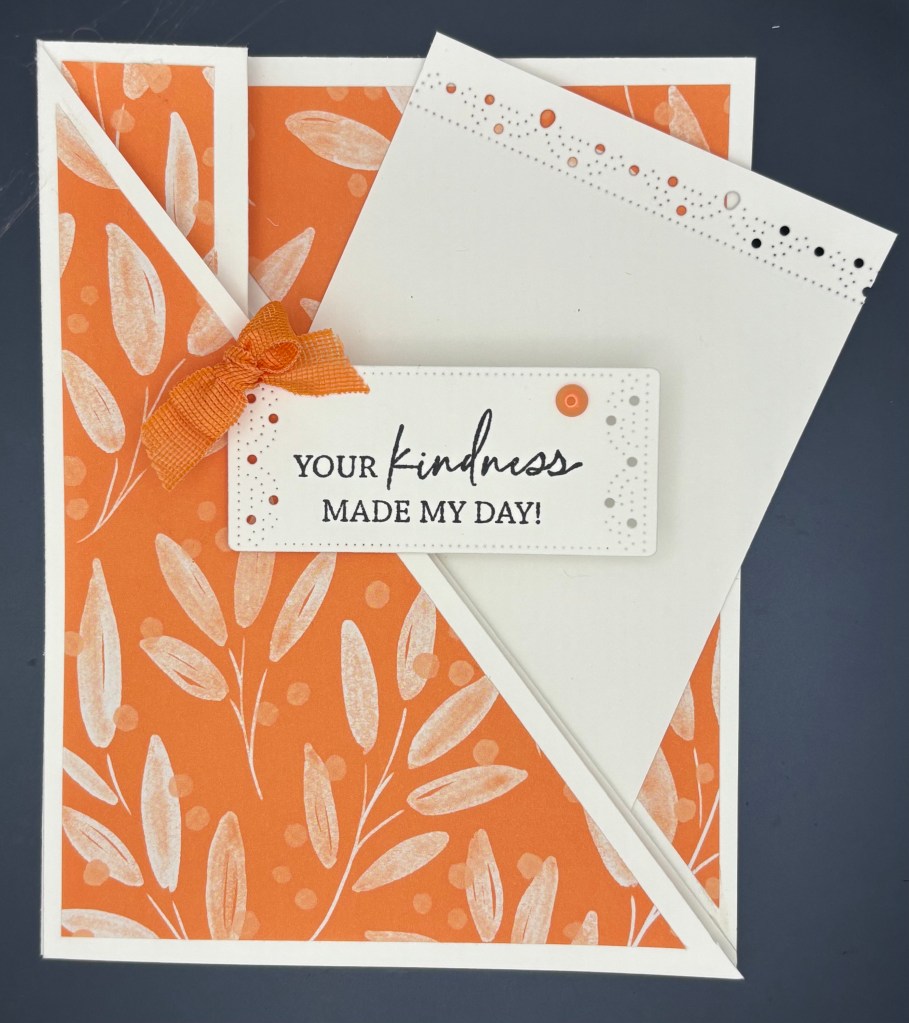
For my fun fold, this month I made an Accordion Pocket Fold inspired by Lisa Ann Bernard.

The Base is 5-1/2″ x 11″ scored at 4-1/4″, 5-1/2″ and 6-3/4″. Then I cut from the 4-1/4″ score line to the bottom right corner (save this piece).

I cut a 6″ 20250-2027 In Color DSP to 4″ x 5-1/4″. I cut this piece diagonally from the top left corner to the bottom right corner. I centered and adhered the left triangle to the front of the card. Then centered and adhered the right triangle to the inside top right.

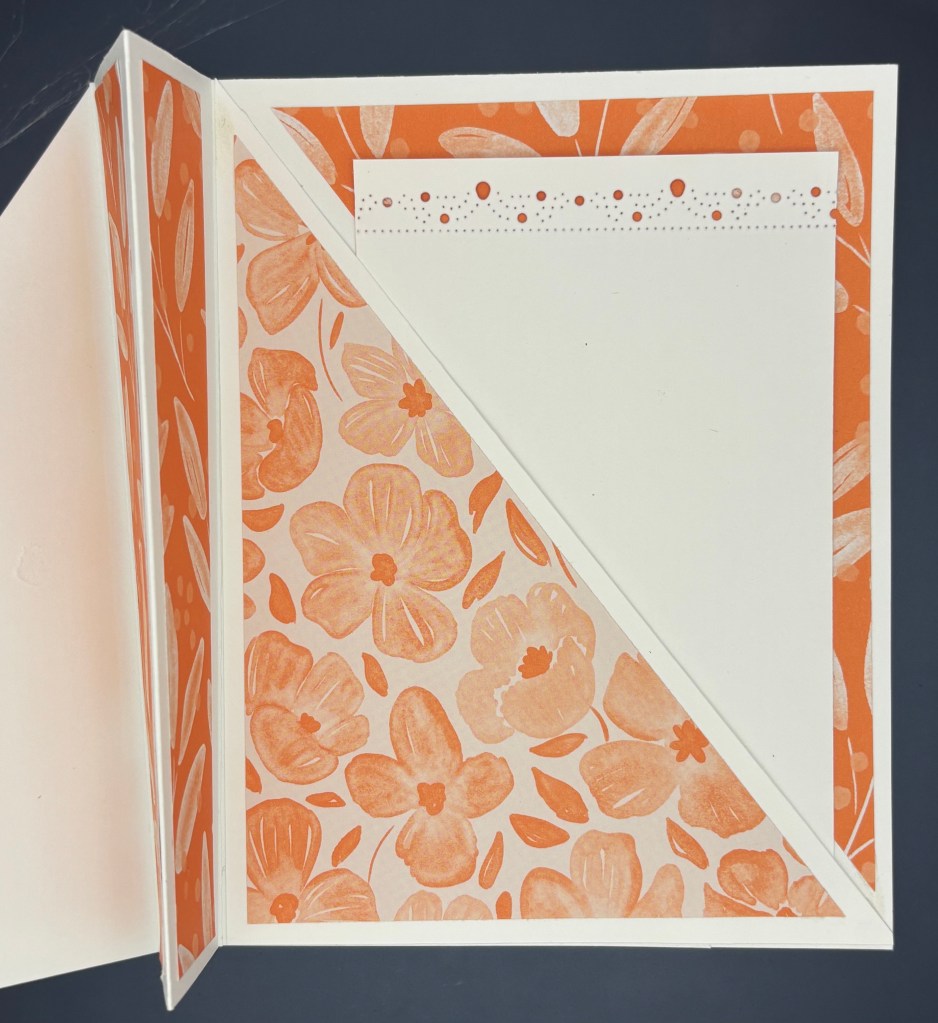
I cut 2 pieces of the same DSP strips at 7/8″ x 5-1/4″. I centered them and adhered them to the inside pillars.

I adhered the “saved” triangle on the inside left of the card. I used Tear and Tape around 2 edges. It was placed right along the 3rd fold line creating a pocket.

I cut a 3-3/4″ x 5″ coordinating DSP. Then cut it diagonally at the top left corner down to the bottom right corner. Center and adhere this DSP to the pocket.

I cut a 3″ x 4-1/2″ piece of white cardstock. Then, I used the Sentimental Frame Dies to decorate the top edge.

Again using the Sentimental Frame dies, I cut a rectangle to use for the sentiment. I used Mixed Labels Stamp Set for the sentiment.

Using Timid Tiger Ribbon, I made a small bow and adhered it with a glue dot. I embellished the card with (1) 2025-2027 In Color Flat Pearl.

This card turned out nice and I enjoyed creating it. The only suggestion I have is be careful for directional DSP.

Thank you for stopping by! Be sure to follow the links below to see the other featured artisans.

SU Demo Fun Fold Blog Hop Lineup

  1. Debbie Mageed
  2. Maria Mench
  3. Karen Finkle
  4. Su Mohr
  5. Rae Burnet
  6. Michele Deschenes
  7. Beth McCullough
  8. Tarabeth Carpenter
  9. Mary Deatherage
  10. Lisa Ann Bernard

August 2025 Global Scrapbook Blog Hop

Thank you for joining us for this month’s blog hop. The theme is Monochromatic. What fun it was searching all my “stash” for yellow DSP and cardstock.

I used all the yellow cardstock I had available. Cut them into 1/2″ strips and laid them out in a pleasing pattern along with DSP 1/2″ strips.

For the DSP I used: Inked Botanicals,Thoughtful Journey, Full of Life, Beautiful Bokeh.

The embellished that were used are: Rainbow Adhesive Dots, Party Dots, Gold Textured Dots, and 2025-2027 In Color Flat Pearls.

I used Mini Alphabet Dies for the word SUMMER.

Stamp sets used were: Reindeer Memories and Just a Note.

The dies used were: Delightful Wishes, Just a Note, and Mixed Labels.

It is so much fun going through the designing process and coming up with a page to follow the theme. I love the process and the end product.

Please follow the links below the see what all the other global artisans created. Thank you!

Next Blog
1.Sharon Dalton – CreativeMe68 (Australia)
2.Julia Quinn – Handmade by Julia Quinn (Australia)
3.Maz Wood – aMAZing Creations (Australia)
4.Margaret Workman – Crafty Chemist Designs (USA)
5.Michele Deschenes Michele’s Craft Cottage (USA)
6.Cheryl Taylor – Stampin n crafting with Cheryldiana – UK
7.Margaret Totallyawake4-life – Coneflower Celebrations

Fun Fold Blog Hop

July 22, 2025

Welcome to the Independent Stampin’ Up! Demonstrators Fun Folds Blog Hop. There’s a lineup below to make it easy for you to hop along and see everyone’s creations.

This month I used the beautiful Kintsugi Inspirations DSP, stamp and dies. If you don’t know what Kintsugi is here is what AI on Google says about it. “Also known as kintsukuroi, it is the Japanese art of repairing broken pottery. This is done by mending the cracks with lacquer mixed with gold, silver, or platinum.”

It is a ancient art form. The DSP in this suite is amazing.

My card is a shadow box fun fold. It starts with a standard card 5-1/2″ x 8-1/2″ scored at 4-1/4″. To the front of the card I added a piece of DSP that measures 4″ x 5-1/2″. I cut another piece of the same cardstock at 5-1/2″ x 6-1/4″. and scored at 1/2″ and 1″ from the left and right on the 6-1/4″ side. Folded and burnished the score lines. Using the largest Sentimental Framing dies I cut out a frame on matching cardstock. With the smaller frame, I then centered and cut a rectangle, for a window. Then I centered the frame on the 5-1/2″ x 6-1/4″ front.

After that I adhered the furthest fold, using glue, to the card front. (be sure to check that you have the card base orientated correctly.)

I used Tear n Tape on both ends of a piece of 1/2″ x 3-7/8″ window sheet. I centered the piece behind the opening. This is where I placed my sentiment.

I fussy cut a bowl and a vase from the DSP, and adhered using dimensionals. I cut the floral piece, in white cardstock, using the die from the set. I then placed it in the tall vase, using glue.

I used the gold Floral Accents embellishments. On the inside of the card, I adhered a piece of 4″ x 5-1/4″ white cardstock. Add a sentiment as desired.

I hope you like this version of a shadow box.

Please follow the links below to see more stunning cards.

SU Demo Fun Fold Blog Hop Lineup

  1. Karen Finkle
  2. Rae Burnet
  3. Debbie Mageed
  4. Su Mohr
  5. Beth McCullough
  6. Tara Beth Carpenter
  7. Mary Deatherage
  8. Lisa Ann Bernard
  9. Maria Mench
  10. Michele Deschenes
  11. Sue Jackson

Fun/Fancy Fold of your Choice Blog Hop

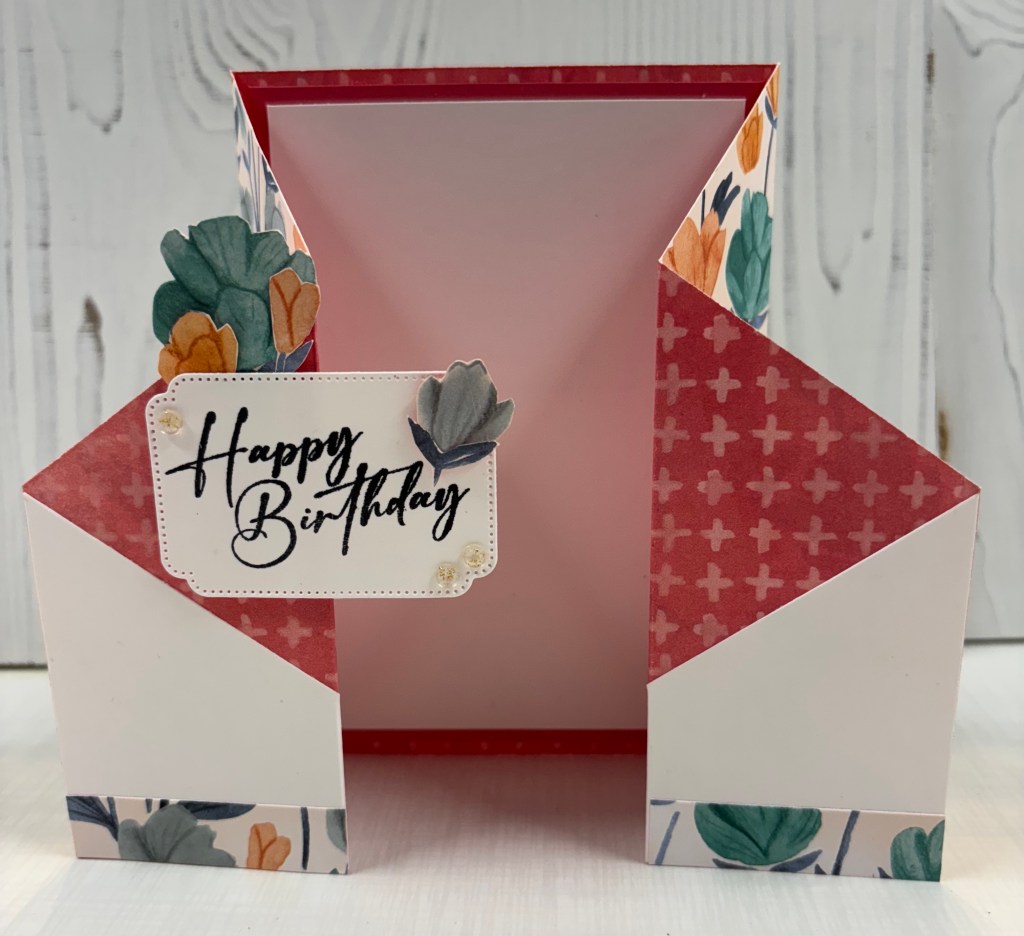
Welcome to the July Fun/Fancy Fold Blog Hop. This month, I used a card from Deb of Delight of my Art. I changed it up a bit. She created a gate fold. She cut off the top right and left corners. Then, she applied them to the bottom left and right corners. Try as a I may, I couldn’t find a way to do that without the flowers being upside down. So I altered it some.

I cut the DSP 5-1/2″ x 12″. Then the DSP is scored at 2″ and 4″ on the left side along the long side. I turned the DSP and again scored at 2″ and 4″ on the right side. This way my score line looked the same. Next I measured down the right side to 2-3/4″ and made a pencil mark. After which I cut from the 4″ score line to the 2-3/4″ mark. Then repeated this on the left side of the DSP.

I traced the cut off pieces of DSP onto white cardstock and cut them. Then those pieces of white cardstock were applied to the left and right bottom corners. Now I had a tuxedo looking card.

I cut (2) 1/2″ x 2″ pieces of DSP and applied to the front of the card at the bottom.

From there I cut a piece of Strawberry Slush cardstock at 3-3/4″ x 5-1/4″. A piece of white cardstock was cut at 3-1/2″ x 5″ and adhered to the Strawberry Slush cardstock. This unit was adhered inside the center panel of the DSP.

After that I stamped a sentiment on white cardstock and cut it using the tag die from Unbounded Love. The sentiment is from the same stamp/dies set.

I fussy cut a few flowers from the Florals in Bloom DSP and placed them around the tag. One was placed inside the card.

To finish the card I added the Strawberry Slush and Pretty in Pink Gems.

I hope you like my card.

Please follow the link below to see the other amazing fun fold cards that were created this month.

1.
Tracy Held – Trace Of Creativity (Australia)
2.
Melva Peters – Stamping With Melva (Canada)
3.
Diane Evans – Stampin with Diane (Canda)
4.
Michele Deschenes Michele’s Craft Cottage (USA)
5.
Sharni Green – The Stamping Green (Australia)acy Held – Trace Of Creativity (Australia)